Mastering Client-Side Authentication with Firebase and SvelteKit
Resources
SvelteKit version: 1.5.0
Firebase version: 9.19.1
GitHub repository: https://github.com/JustinyAhin/okupter-repos/tree/main/apps/sveltekit-auth-firebase
Demo site: https://sveltekit-auth-firebase.vercel.app
Navigating the world of user authentication can be daunting, especially when you're trying to create a seamless and secure experience for your users. If you're building a SvelteKit application and looking for a reliable, easy-to-integrate solution, then Firebase might just be the answer to your prayers. This blog post'll delve into the exciting realm of SvelteKit authentication with Firebase.
We'll explore:
Setting up your SvelteKit project and integrating Firebase
Choosing and implementing the right authentication method
Creating user-friendly login and registration components
Protecting your routes with route guards
And finally, logging users out and managing their authentication state
Whether you're new to SvelteKit and Firebase or looking to enhance your existing project, this guide will walk you through each step to make user authentication a breeze. So, strap in, and let's unlock the full potential of SvelteKit client-side authentication with Firebase!
Setting up the project
In this section, we'll set up a new SvelteKit project with TypeScript, install Firebase, and configure it within our project.
Create a new SvelteKit project
To get started, open your terminal and run the following command to create a new SvelteKit project with TypeScript using pnpm:
pnpm create svelte@latest sveltekit-auth-firebase
cd sveltekit-auth-firebase
When going through the CLI option, make sure to choose TypeScript. Trust me; you'll thank me later. TypeScipt with SvelteKit is a delightful experience.
Install and setup Firebase
Once inside your new project directory, run the following command to install Firebase:
pnpm install firebaseCreate a new firebase.ts file in the /src/lib folder.
import {
  PUBLIC_FIREBASE_API_KEY,
  PUBLIC_FIREBASE_AUTH_DOMAIN,
  PUBLIC_FIREBASE_PROJECT_ID,
  PUBLIC_FIREBASE_STORAGE_BUCKET,
  PUBLIC_FIREBASE_MESSAGING_SENDER_ID,
  PUBLIC_FIREBASE_APP_ID
} from '$env/static/public';
import { initializeApp, getApps } from 'firebase/app';
import { getAuth } from 'firebase/auth';

const firebaseConfig = {
  apiKey: PUBLIC_FIREBASE_API_KEY,
  authDomain: PUBLIC_FIREBASE_AUTH_DOMAIN,
  projectId: PUBLIC_FIREBASE_PROJECT_ID,
  storageBucket: PUBLIC_FIREBASE_STORAGE_BUCKET,
  messagingSenderId: PUBLIC_FIREBASE_MESSAGING_SENDER_ID,
  appId: PUBLIC_FIREBASE_APP_ID
};

// Initialize Firebase
let firebaseApp;

if (!getApps().length) {
  firebaseApp = initializeApp(firebaseConfig);
}

// Auth
const firebaseAuth = getAuth(firebaseApp);

export { firebaseApp, firebaseAuth };
We are importing Firebase modules to initialize a new app and create an authentication wrapper.
Notice that we are checking here if getApps().length is undefined before creating a new app. This is because the app could be created many times during navigation, and we don't want conflicts that could trigger errors later on.
Also, notice that the environment variables here are prefixed with PUBLIC_.; since the Firebase keys and app details can be safely exposed to the client.
You can get these theses variables from your Firebase app console.
Now that our SvelteKit project is set up with Firebase and TypeScript, we're ready to move on to the next section: choosing and implementing the right authentication method.
Firebase authentication methods
Firebase offers a variety of authentication methods to suit your application's needs. This section briefly discusses some of the most popular methods and then focuses on implementing email/password authentication for our SvelteKit app.
Email/Password: Allows users to sign up and sign in using their email address and a password.
Google Sign-In: This lets users sign in with their Google accounts.
Facebook Login: Enables users to sign in with their Facebook accounts.
Twitter Login: Allows users to sign in with their Twitter accounts.
GitHub Login: Permits users to sign in with their GitHub accounts.
Phone Number Authentication: Authenticates users using their phone numbers and SMS verification.
Even more, methods are available, but these are some of the most commonly used. For this tutorial, we'll focus on email/password authentication.
You can learn more about the different authentication methods here.
Enabling email/password authentication in your Firebase app
Once you get your new Firebase app up, you can enable the email/password authentication like this:
Go to the Firebase Console and select your project.
Click on "Authentication" in the left sidebar.
Navigate to the "Sign-in method" tab.
Scroll down to find "Email/Password" and click on the edit icon (pencil) to enable it.
Toggle the "Enable" switch and save your changes.
Creating Auth Routes: Log in and Registration
Now, let's create the necessary routes for our login and registration components. Both pages will have a form with email and password fields and a submit button.
<!-- src/routes/register/+page.svelte -->

<script lang="ts">
  let email: string;
  let password: string;
</script>

<form
  class="flex flex-col gap-4 p-8 space-y-4 bg-white sm:w-10/12"
  on:submit|preventDefault={register}
>
  <input
    type="email"
    placeholder="Email"
    class="px-4 py-2 border border-gray-300 rounded-md"
    required
    bind:value={email}
  />
  <input
    type="password"
    placeholder="Password"
    class="px-4 py-2 border border-gray-300 rounded-md"
    required
    bind:value={password}
  />

  <button type="submit" class="default-action">Register</button>
</form>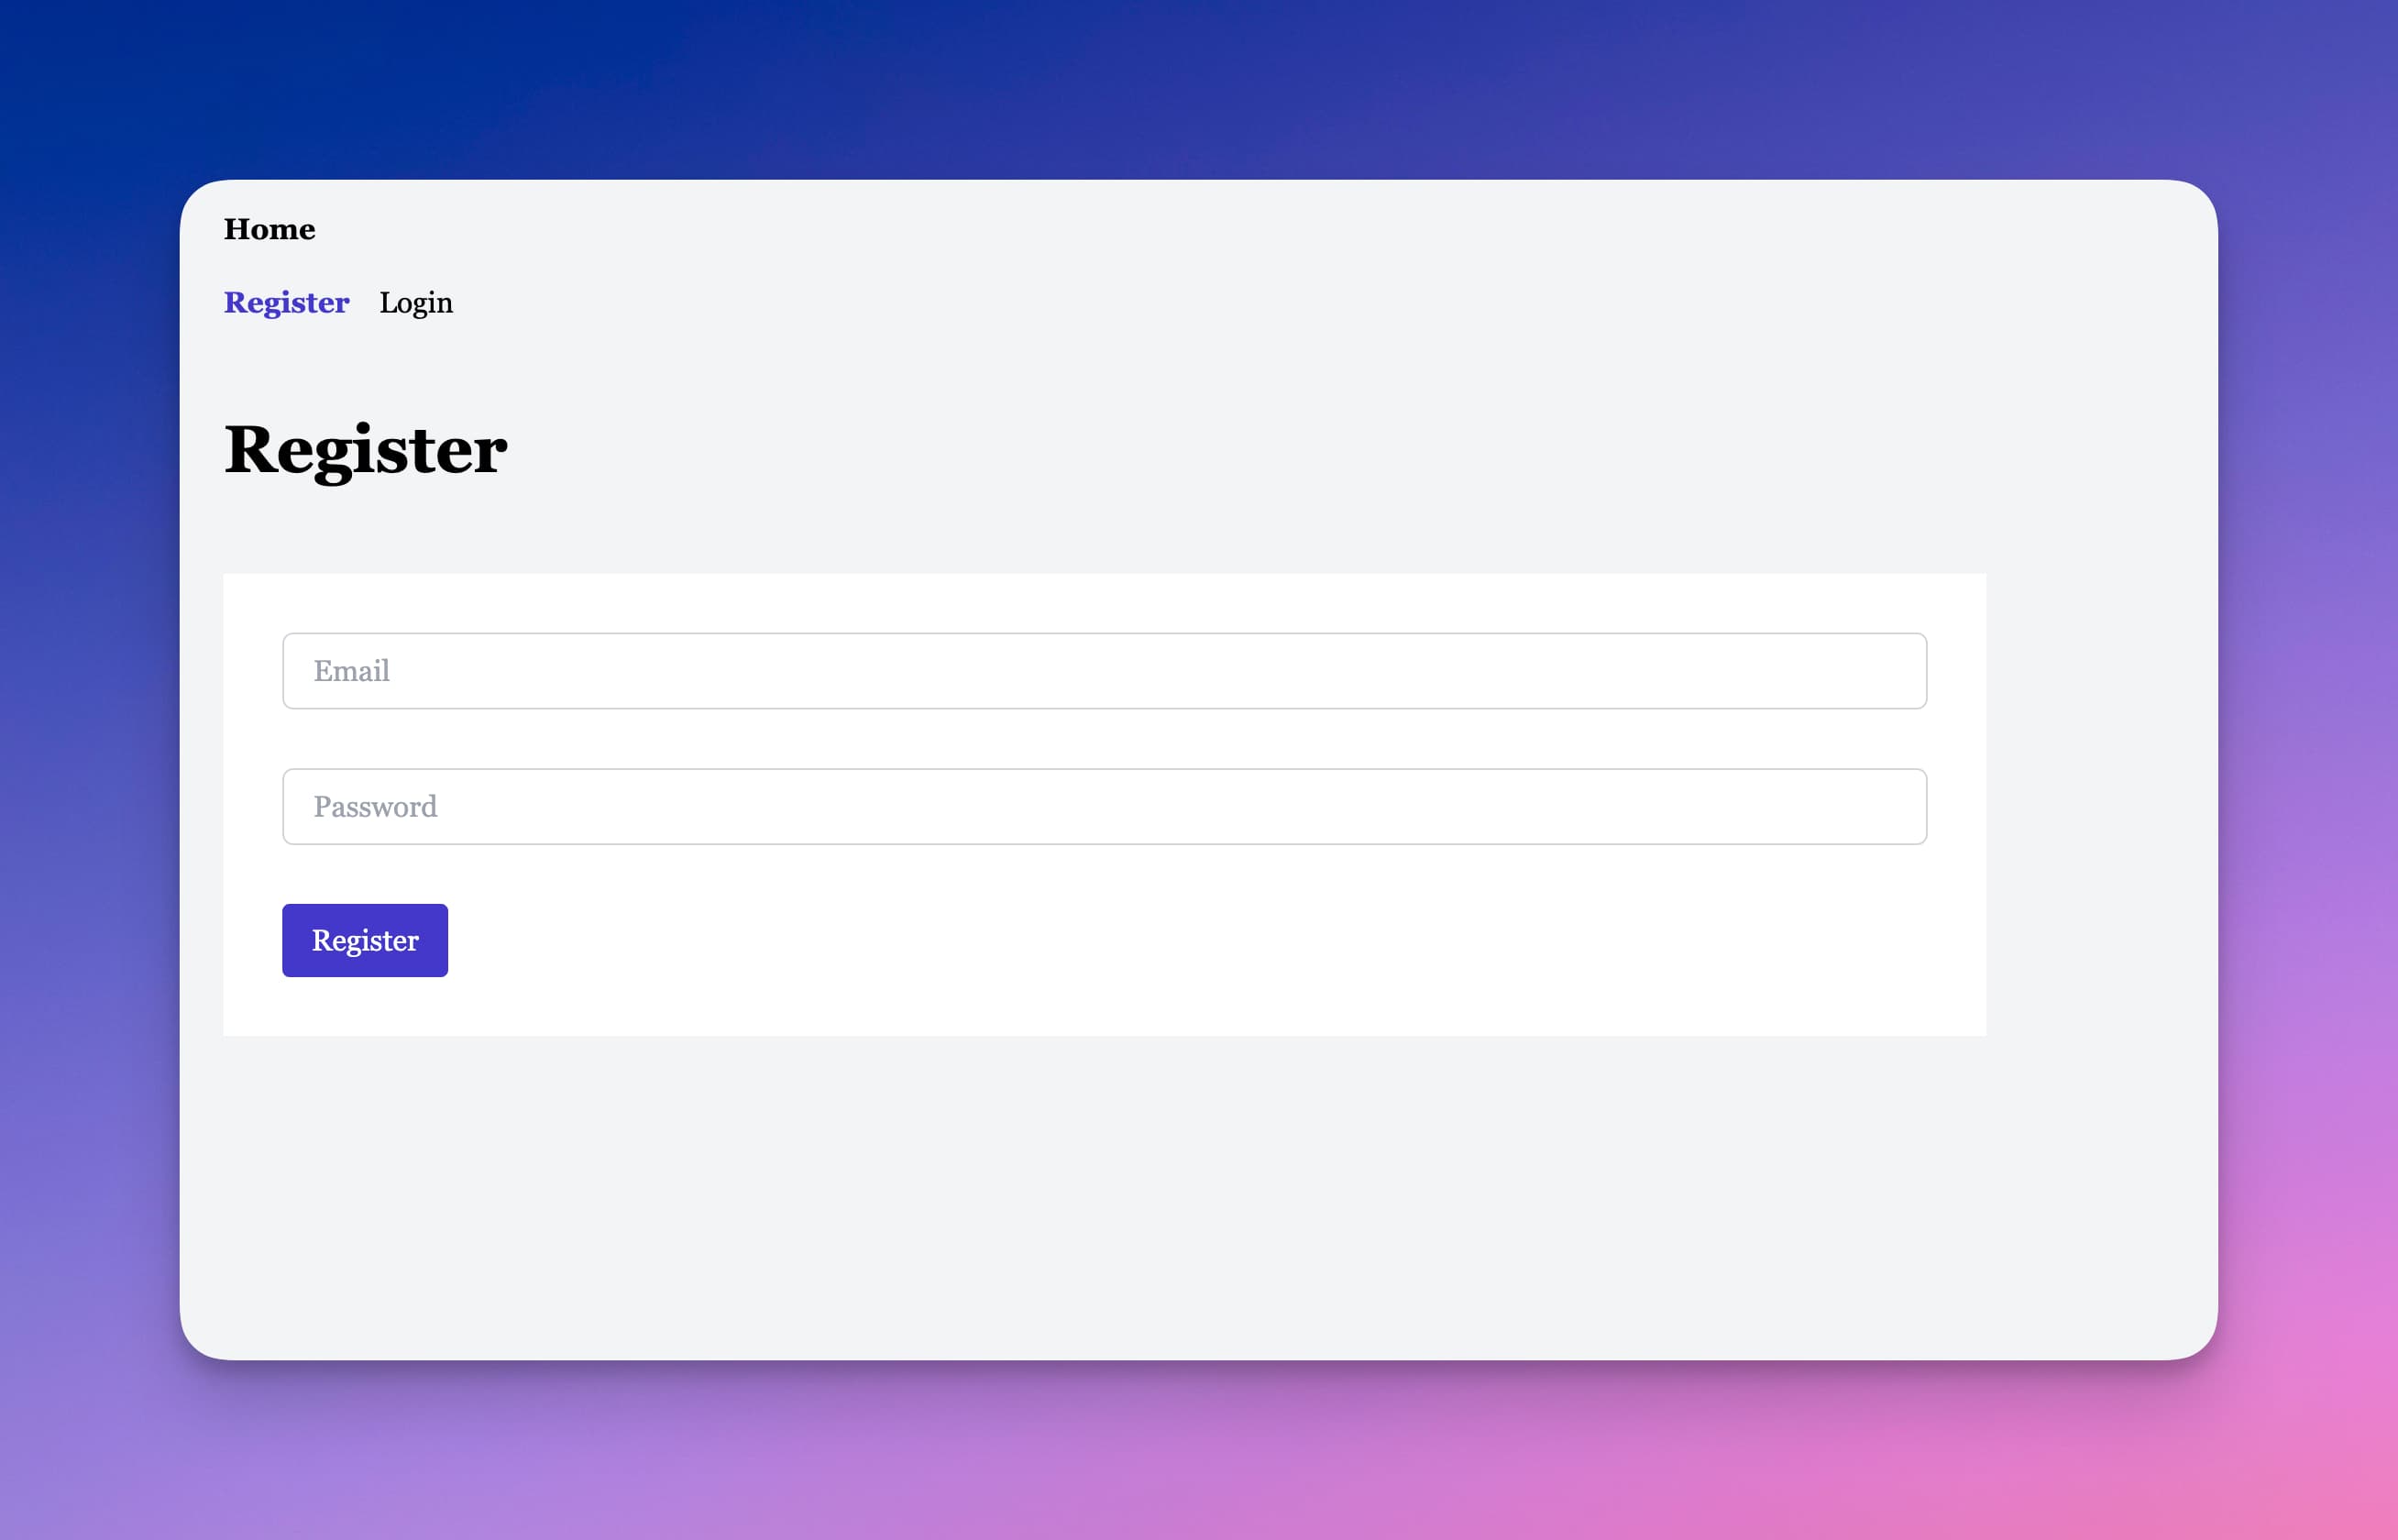
And for the login route:
<!-- src/routes/login/+page.svelte -->

<script lang="ts">
  let email: string;
  let password: string;
</script>

<form
  class="flex flex-col gap-4 p-8 space-y-4 bg-white sm:w-10/12"
  on:submit|preventDefault={login}
>
  <input
    type="email"
    placeholder="Email"
    class="px-4 py-2 border border-gray-300 rounded-md"
    required
    bind:value={email}
  />
  <input
    type="password"
    placeholder="Password"
    class="px-4 py-2 border border-gray-300 rounded-md"
    required
    bind:value={password}
  />

  <button type="submit" class="default-action">Login</button>
</form>
Notice that we are binding submission on the forms to two functions register() and login() that we are going to use to handle the logic.
We also bind the input values with the variables: let email: string and let password: string.
Handling registration and login logic
We will use the createUserWithEmailAndPassword() function from Firebase for user registration. It takes the authentication wrapper, the email, and the password as arguments.
<script lang="ts">
  import { goto } from '$app/navigation';

  import { createUserWithEmailAndPassword } from 'firebase/auth';
  import { firebaseAuth } from '$lib/firebase';

  let email: string;
  let password: string;

  let success: boolean | undefined = undefined;

  const register = () => {
    createUserWithEmailAndPassword(firebaseAuth, email, password)
      .then(() => {
        goto('/login');
      })
      .catch((error) => {
        const errorCode = error.code;
        const errorMessage = error.message;
        console.log(errorCode, errorMessage);

        success = false;
      });
  };
</script>
We are also using goto() here to redirect to the login page in case the sign-up is successful. Else, we just log the errors in the console.
In addition, we also set up the value of the reactive variable success to false in case of an error.
This allows us to display custom error messages to the user when something goes wrong:
<form
  class="flex flex-col gap-4 p-8 space-y-4 bg-white sm:w-10/12"
  on:submit|preventDefault={register}
>
  {#if !success && success !== undefined}
    <div class="p-8 text-red-500 bg-red-100">There was an error registering. Please try again.</div>
  {/if}
</form>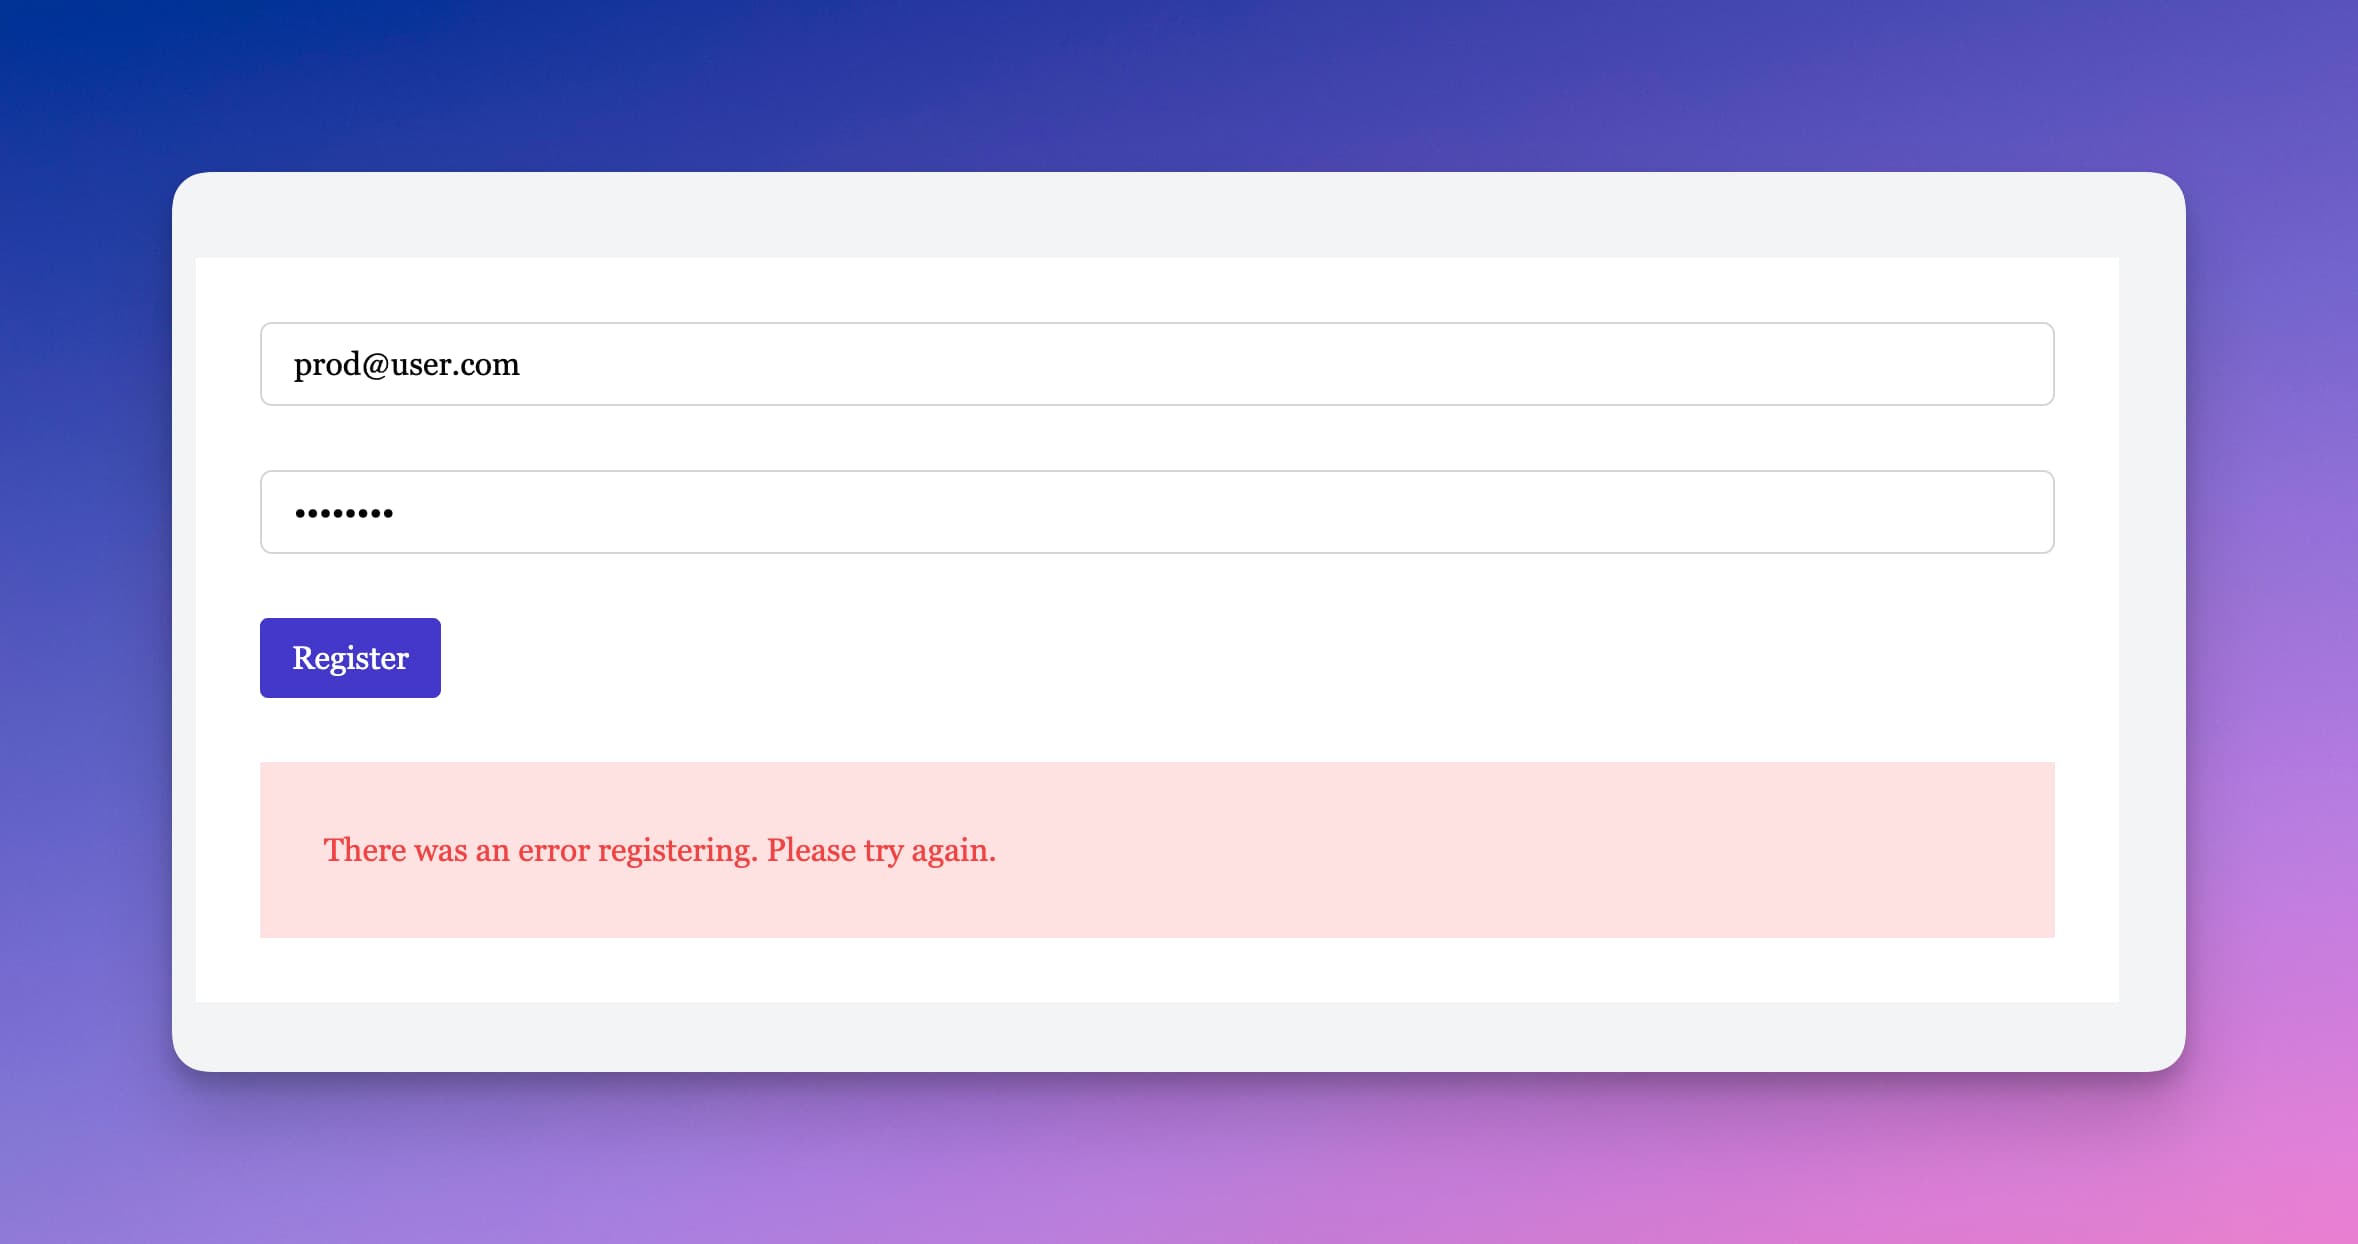
If you need to do something with the user credentials after the sign-up process, you can add this variable to the then() statement. It will look like this:
const register = () => {
    createUserWithEmailAndPassword(firebaseAuth, email, password)
      .then((userCredentials) => {
        // Log the credentials
        console.log(userCredentials);

        goto('/login');
      })
      .catch((error) => {
        const errorCode = error.code;
        const errorMessage = error.message;
        console.log(errorCode, errorMessage);

        success = false;
      });
  };
Let's now look at the login logic:
const login = () => {
    signInWithEmailAndPassword(firebaseAuth, email, password)
      .then(() => {
        goto('/protected');
      })
      .catch((error) => {
        const errorCode = error.code;
        const errorMessage = error.message;
        console.log(errorCode, errorMessage);

        success = false;
      });
  };
This is similar to the registration logic, except we use the signInWithEmailAndPassword() function.
So, that's it. We just did registration and login with Firebase. But that's not enough (fortunately). Notice that we are redirecting to a /protected route in case of a successful login.
That means we need to find a way to pass the login state to this route and other places in our application that might need it.
Making use of Svelte stores
Svelte stores are a cool way to share states across Svelte applications. They are used to create variables that are reactive, and can be shared, updated, and synced pretty much everywhere in your Svelte app.
To start, let's create a src/lib/authStore.ts file with the following content:
import { writable } from 'svelte/store';

interface AuthUser {
  uid: string;
  email: string;
}

const authUser = writable<AuthUser | undefined>(undefined);

export { authUser };
A writable in Svelte is a function that creates a store for which the value can be updated later on. It's perfect for our use case.
Here we are creating a writable store with the default value of undefined. We are also typing this store to get auto-completion and type-safety later on.
Now, we can add this store to our login logic. What we want is to save the logged-in user email and identifier in the store when the operation is successful:
import { authUser } from '$lib/authStore';

const login = () => {
    signInWithEmailAndPassword(firebaseAuth, email, password)
      .then(() => {
        $authUser = {
          uid: userCredential.user.uid,
          email: userCredential.user.email || ''
        };

        goto('/protected');
      })
      .catch((error) => {
        const errorCode = error.code;
        const errorMessage = error.message;
        console.log(errorCode, errorMessage);

        success = false;
      });
  };
Since a writable store is a function, we can not access its value as other JavaScript variables. That's why stores come with some functions to set and update their value and subscribe and unsubscribe to their change.
On top of that, Svelte uses the less verbose $ symbol to subscribe and unsubscribe to the value of a store automatically.
That's what we are using in the snippet above.
Guarding the protected route
We are now ready to create a protected route and guard it appropriately.
Let's create a simple src/routes/protected/+page.svelte file for the component and src/routes/protected/+page.ts for the authorization logic:
<!-- src/routes/protected/+page.svelte -->

<svelte:head>
  <title>Protected route</title>
</svelte:head>

<h1 class="text-4xl font-bold">Protected route</h1>
// src/routes/protected/+page.ts
import { authUser } from '$lib/authStore';
import { redirect } from '@sveltejs/kit';
export const load = async () => {
const unsubscribe = authUser.subscribe((user) => {
if (!user) {
throw redirect(302, '/login');
}
});
unsubscribe();
return {};
};As you can see there, we are importing the store, subscribing to its value, and redirecting to the login page if there is no user.
And we unsubscribe from the store right after. Every time a non-authenticated user will try to access that route, they will be automatically redirected to login.
Login out
The last thing to add now is the logout feature. Here again, Firebase comes to the rescue with a function that does exactly that.
I'm going to add the login button in the src/routes/+layout.svelte file:
<script lang="ts">
  import { page } from '$app/stores';
  import { goto } from '$app/navigation';
  import { signOut } from 'firebase/auth';
  import { firebaseAuth } from '$lib/firebase';
  import { authUser } from '$lib/authStore';

  const handleLogout = () => {
    signOut(firebaseAuth)
      .then(() => {
        $authUser = undefined;
        goto('/login');
      })
      .catch((error) => {
        console.log(error);
      });
  };
</script>

<header class="space-y-4">
  <a href="/" class="font-bold hover:underline">Home</a>

  <nav class="flex gap-4">
    {#if $authUser}
      <a
        href="/protected"
        class="hover:underline"
        class:active={$page.url.pathname === '/protected'}>Protected</a
      >
      <button class="hover:underline" on:click={handleLogout}>Logout</button>
    {:else}
      <a href="/register" class="hover:underline" class:active={$page.url.pathname === '/register'}
        >Register</a
      >
      <a href="/login" class="hover:underline" class:active={$page.url.pathname === '/login'}
        >Login</a
      >
    {/if}
  </nav>
</header>
The handleLogout() function uses the signOut() method from Firebase. In addition, we set the authUser store value to undefined.
Persisting Authentication State with Firebase
Svelte stores help manage state easily, but state is not persisted on page refreshes. Fortunately, Firebase offers built-in options for handling auth state persistence. This way, users stay authenticated even after reloading the page or returning to the app later.
In an upcoming post, I'll explore Firebase auth state persistence features and demonstrate how to integrate them into your SvelteKit app for a seamless authentication experience. For more information, check out the official Firebase documentation.
Wrapping up
In conclusion, implementing client-side authentication with Firebase and SvelteKit is an effective and straightforward process. By utilizing Firebase's robust authentication methods and SvelteKit's simplicity, we've managed to create a secure and user-friendly authentication system. Additionally, incorporating Svelte stores into our application has allowed us to maintain a shared state for authentication, making it easier to manage user login and logout events.
With this knowledge, you're now equipped to create a robust and secure SvelteKit application that best uses Firebase authentication. As you continue to develop your project, remember to keep security in mind and make use of the available tools and best practices to ensure the safety of your users' data. Happy coding!