How to upload files to Cloudflare R2 in SvelteKit
Resources
SvelteKit version: 1.5.0
@aws-sdk/client-s3 version: 3.332.0
@aws-sdk/s3-request-presigner version: 3.332.0
GitHub repository: https://github.com/JustinyAhin/okupter-repos/tree/main/apps/cloudflare-r2-sveltekit
Demo website: https://cloudflare-r2-sveltekit.vercel.app/
I've been willing to try out Cloudflare R2 for a while now. The product looks amazing, the pricing is appealing, and on top of that, it's being built by a company I trust and use for many of my projects.
In the last couple of weeks, I finally had the occasion to use it on two different projects.
This blog post is a quick guide on how to upload files to Cloudflare R2 in SvelteKit, based on my experience.
What is Cloudflare R2?
R2 is a global object storage service. You can see it as a competitor for popular services in the same category, such as Amazon S3, Google Cloud Storage, or DigitalOcean Spaces.
Here are a few of the features that make R2 stand out:
Globally distributed storage: R2 is built on top of Cloudflare's global network, which means that your files are stored in multiple locations around the world. This allows for faster uploads and downloads and also makes your files more resilient to failures.
S3 compatible API: R2 is compatible with the S3 API, which means that you can use any S3 client to interact with it. This is great because it means that you can use tools and libraries you're already familiar with.
Zero egress fees: R2 doesn't charge for data transfer, which means that you can upload and download as much data as you want without worrying about the cost. Cloudflare pricing is based on the volume of data stored and the number of requests made to the API.
R2 is very easy to use: If you've used some S3 in the past, you probably know that it can be a bit tricky to set up. From unknown or not well-documented errors to hard debuggable fails, it can be a bit of a pain. R2 abstracts a lot of the complexity away and makes it very easy to get started.
On top of all this, Cloudflare also offers a generous free tier, with 10GB of storage, 1.000.000 write operations, and 10.000.000 read operations per month.
Now that we know what R2 is, let's see how to use it in SvelteKit.
Installing and setting up a new SvelteKit project
The first step is of course to create a new SvelteKit project, with TypeScript, preferably.
pnpm create svelte@latest cloudflare-r2-sveltekitIf you have read my previous article about implementing file upload in SvelteKit, you can reuse some of the code we wrote there.
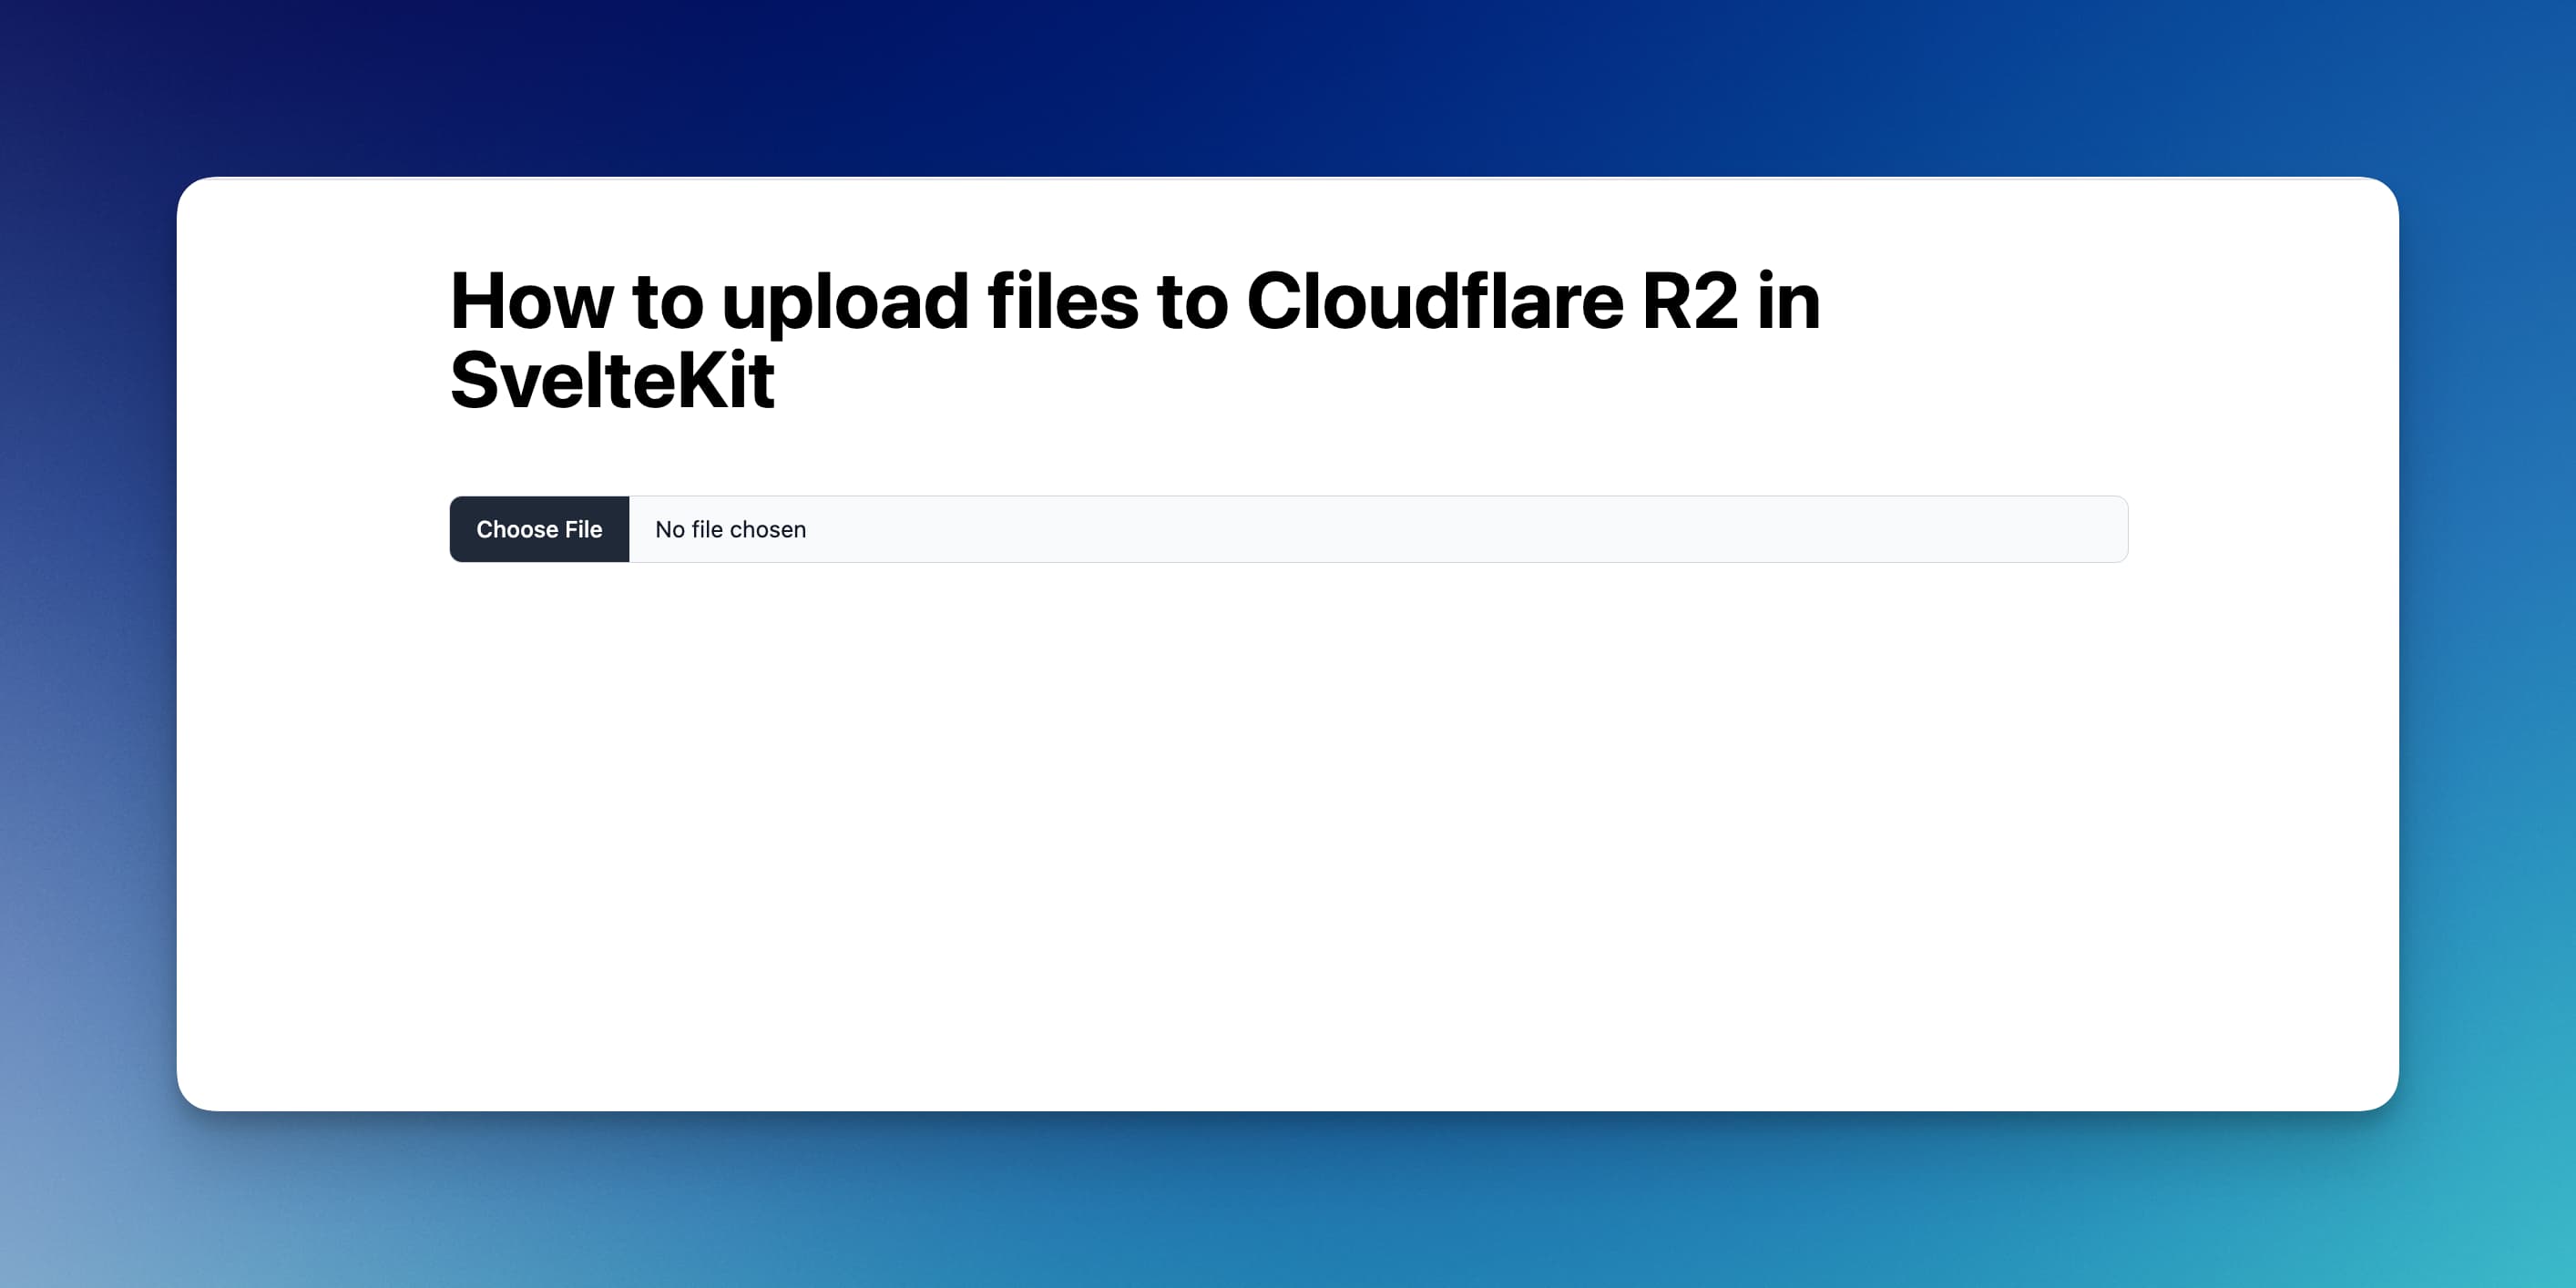
Styling the upload form
For this post, I'm going to use some components from Flowbit Svelte to style the upload form. You can of course use any other CSS framework or write your own styles.
You can find here the steps to install Flowbit Svelte in your project.
Here is what the upload form looks like in the browser:
Installing the S3 dependencies
R2 provides a few ways to interact with the API. You could either use the Cloudflare workers API or a compatible S3 client. For this post, I'm going to use the Modularize AWS SDK for JavaScript.
We will also make use of pre-signed URLs to share access to our files without revealing our API credentials.
Let's install the dependencies:
pnpm add @aws-sdk/client-s3 @aws-sdk/s3-request-presignerUpload flow
Here is a quick overview of the upload flow we're going to implement:
The user selects a file to upload (client)
We make a request to a server endpoint to get a pre-signed URL (server)
When the endpoint returns the URL, we upload the file to R2 (client)
The user can now access the file using the URL
New Bucket setup in R2
Let's start by creating a new bucket in R2. You can do this from your Cloudflare dashboard, in the R2 section.
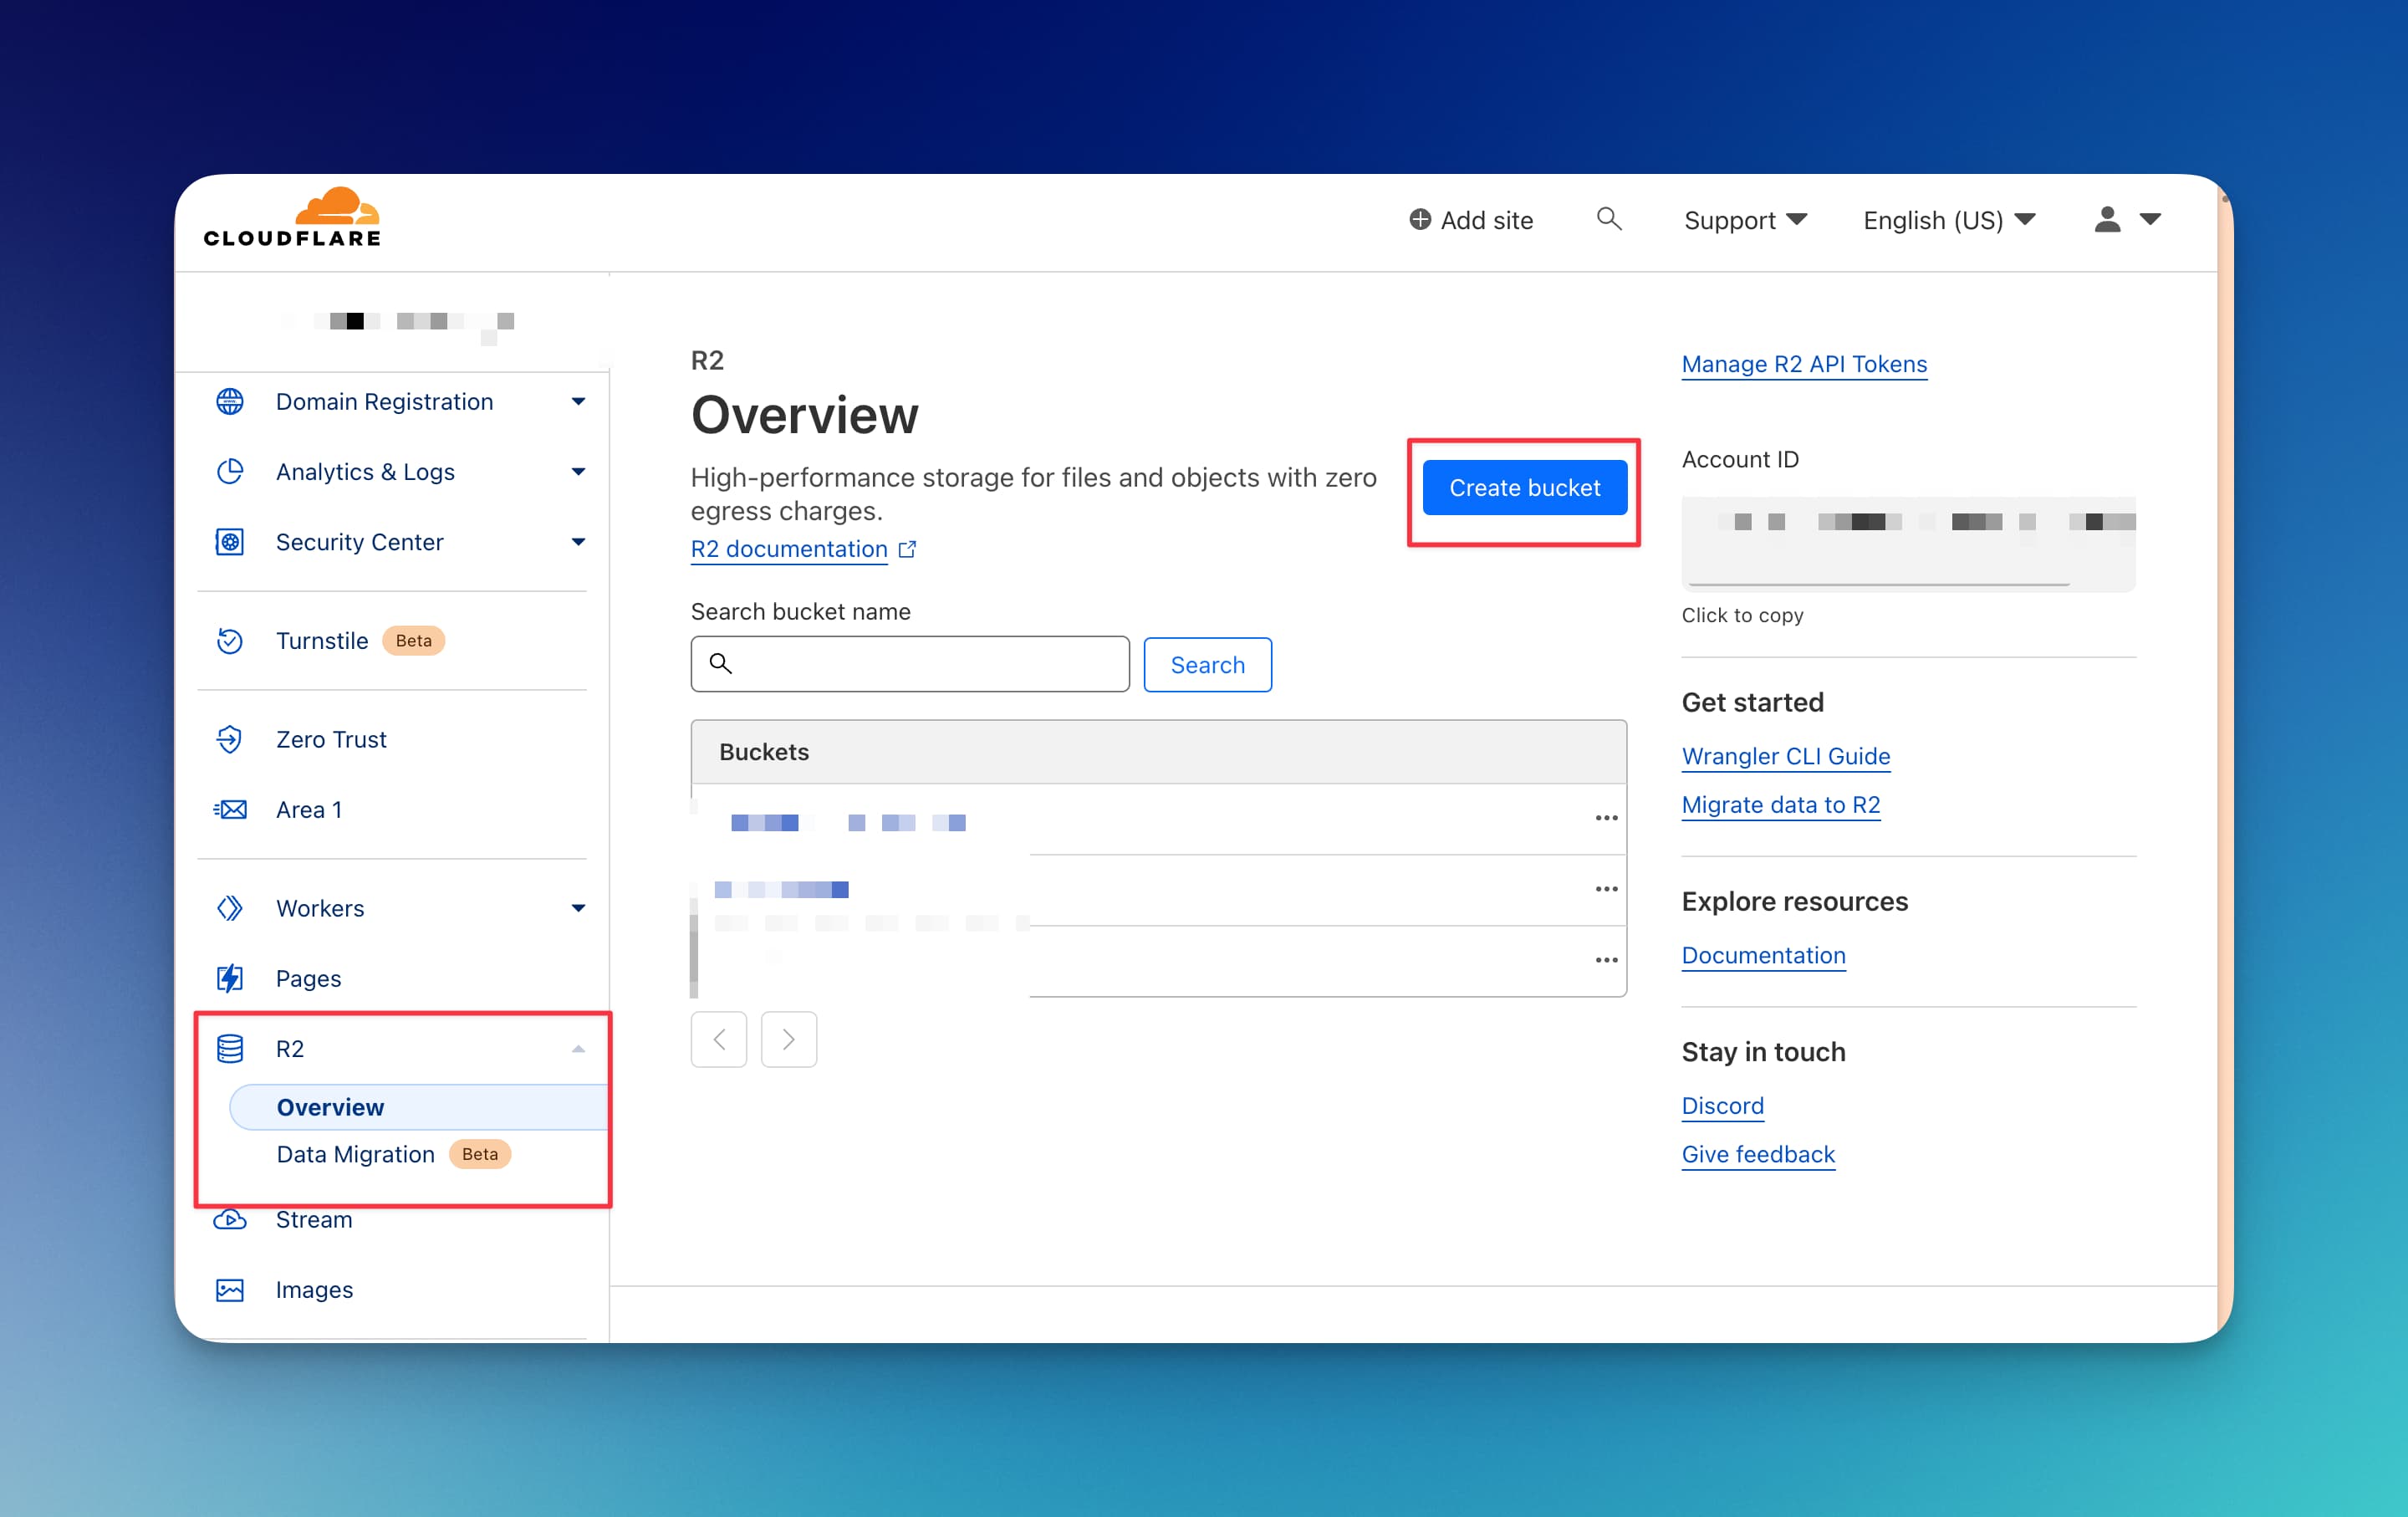
Once the bucket is created, you can click on it to access the settings. We will need to update the CORS settings to allow uploads from our domain.
For that, go to the settings page of the bucket, click on "Edit CORS policy"; and update the policy to allow uploads from your domain:
[
  {
    "AllowedOrigins": [
      "yourdomain.com", "http://localhost:5173"
    ],
    "AllowedMethods": [
      "GET",
      "PUT",
      "POST"
    ],
    "AllowedHeaders": [
      "*"
    ],
    "ExposeHeaders": []
  }
]
Here, we are allowing uploads from our domain and from localhost, which is useful for development.
Creating a new S3 client
To create a new S3 client, we need to get our API tokens from the R2 dashboard. You can create new API tokens by clicking on "Manage R2 API Tokens" in the R2 section of the dashboard.
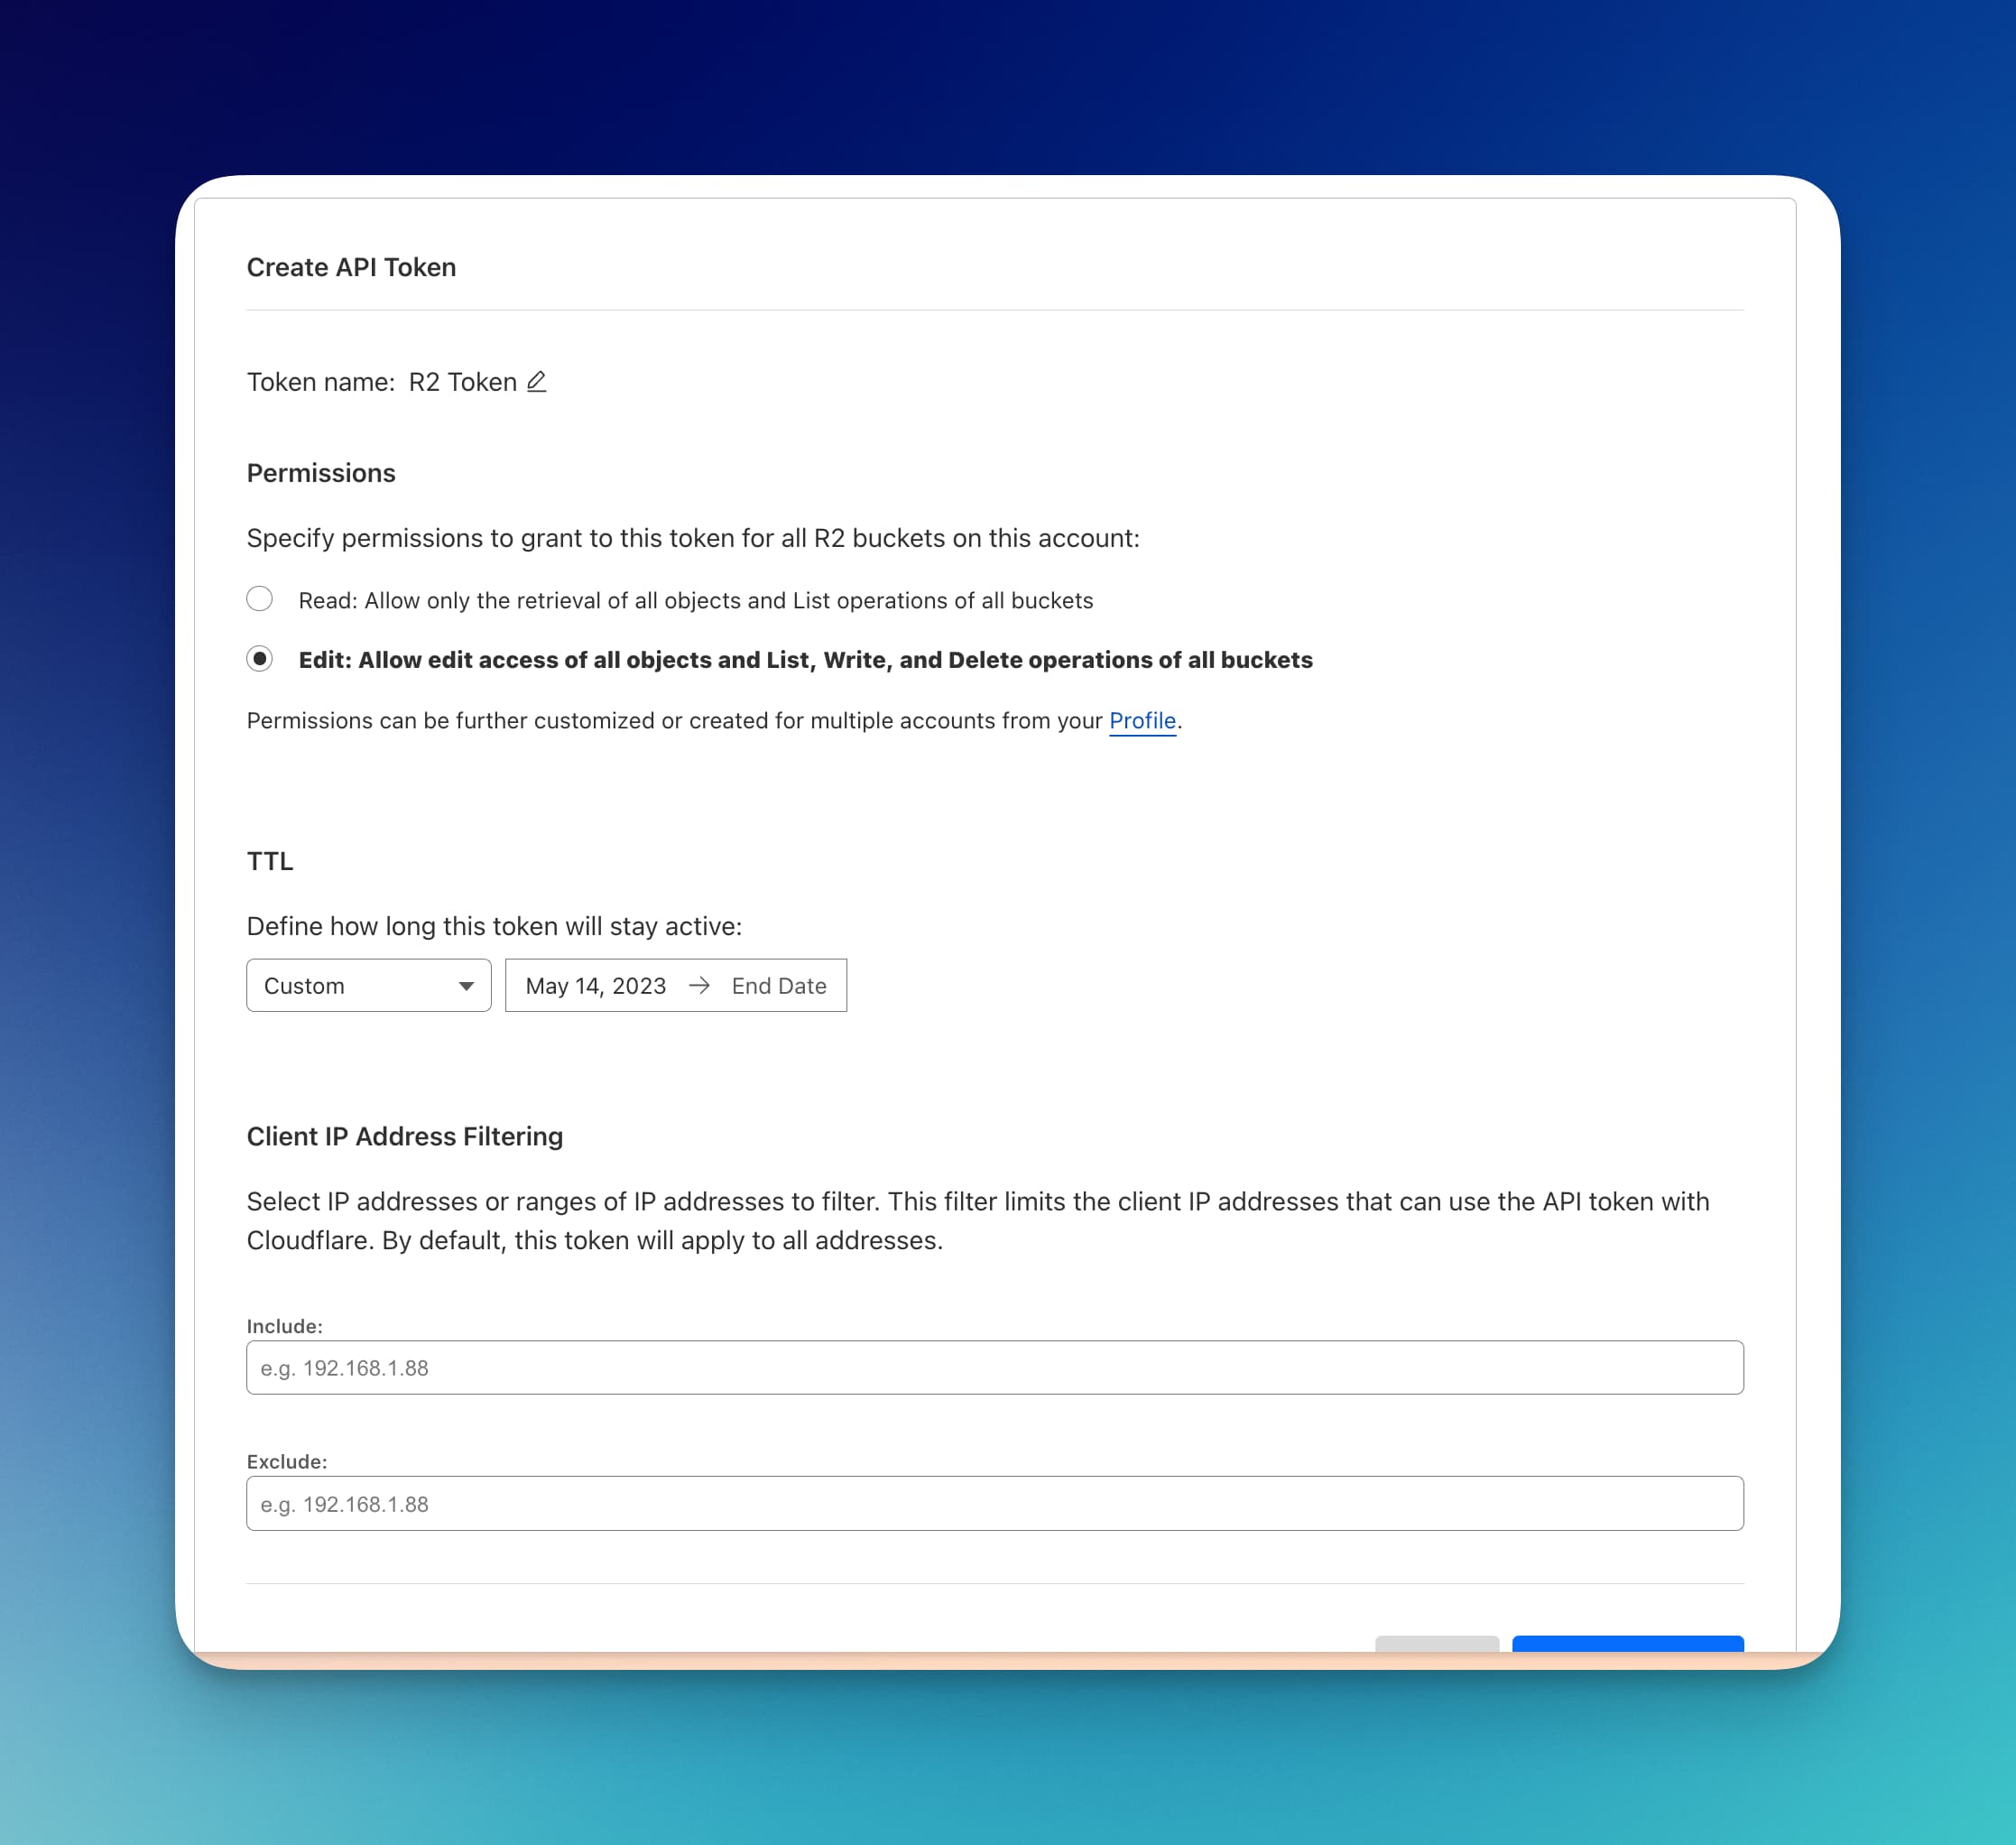
Once you have created the token, you can copy the key and secret and use them to create a new S3 client in a src/lib/s3.ts file:
import { R2_ACCESS_KEY, R2_ACCOUNT_ID, R2_SECRET_KEY } from "$env/static/private";
import { S3Client } from "@aws-sdk/client-s3";

const S3 = new S3Client({
    region: "auto",
    endpoint: `https://${R2_ACCOUNT_ID}.r2.cloudflarestorage.com`,
    credentials: {
        accessKeyId: R2_ACCESS_KEY,
        secretAccessKey: R2_SECRET_KEY,
    },
});

export { S3 };
We are using the R2_ACCOUNT_ID environment variable to build the endpoint URL. This is the same ID you can find in the URL of your R2 dashboard.
Generating a pre-signed URL
On the client side, here is what a rough implementation of the upload flow looks like at this point:
<script lang="ts">
	import { Fileupload } from 'flowbite-svelte';

	const handleFileUpload = (e: Event) => {
		const target = e.target as HTMLInputElement;
		const file = target.files?.[0];

		if (file) {
			console.log(file);
		}
	};
</script>

<svelte:head>
	<title>How to upload files to Cloudflare R2 in SvelteKit</title>
</svelte:head>

<main class="max-w-5xl py-12 mx-auto space-y-12">
	<h1>How to upload files to Cloudflare R2 in SvelteKit</h1>

	<Fileupload id="with_helper" class="mb-2" on:change={handleFileUpload} />
</main>
We are getting the file data from the change event of the Fileupload component. We can then use this data to make a request to our server endpoint to get a pre-signed URL.
Because we are using secret keys to generate the URLs, we need to do this on the server.
Let's create a new endpoint in src/routes/api/upload/+server.ts:
import { PUBLIC_S3_BUCKET_NAME } from '$env/static/public';
import { S3 } from '$lib/s3';
import { PutObjectCommand } from '@aws-sdk/client-s3';
import { getSignedUrl } from '@aws-sdk/s3-request-presigner';
import { json } from "@sveltejs/kit";

const slugifyString = (str: string) => {
    return str.trim().toLowerCase().replace(/\s+/g, '-').replace(/\./g, '-').replace(/-+/g, '-').replace(/[^a-z0-9-]/g, '-');
}

export const POST = async ({ request }) => {
    const { fileName, fileType, } = await request.json() as { fileName: string | undefined, fileType: string | undefined };

    if (!fileName || !fileType || fileName.trim() === '' || fileType.trim() === '') {
        return json({ message: 'Missing required parameters.' }, { status: 400 });
    }

    const objectKey = `${slugifyString(Date.now().toString())}-${slugifyString(fileName)}`;

    const presignedUrl = await getSignedUrl(S3, new PutObjectCommand({
        Bucket: PUBLIC_S3_BUCKET_NAME,
        Key: objectKey,
        ContentType: fileType,
        ACL: 'public-read'
    }), {
        expiresIn: 60 * 5 // 5 minutes
    });

    return json({ presignedUrl, objectKey });
};
They are a lot of things going on here, so let's break it down.
First, we are getting the
fileNameandfileTypefrom the request body (we will send them from the client).Then we are doing some validation to make sure the parameters are not empty or undefined.
To avoid any weird characters in the file name, we are using a
slugifyStringfunction to transform the file name into a URL-friendly string. We are also adding a timestamp to the file name to make sure we don't have any conflicts.We are then using the
getSignedUrlfunction from the@aws-sdk/s3-request-presignerpackage to generate a pre-signed URL. We are using thePutObjectCommandto create a new object in our bucket. We are also setting theACLtopublic-readto make sure the file is publicly accessible.
Notices that we've set the expiresIn option to 5 minutes. This means that the URL will expire after 5 minutes. This is useful to avoid having a URL that can be used by anyone to upload files to our bucket. Since the URL will be used right after by the client, we could even have set a much shorter expiration time.
Finally, we are returning the pre-signed URL and the object key to the client.
Now, let's update our client-side code to use this endpoint:
<script lang="ts">
  const handleFileUpload = async (e: Event) => {
		const target = e.target as HTMLInputElement;
		const file = target.files?.[0];

		if (file) {
			const getPresignedUrlResponse = await fetch('/api/upload', {
				method: 'POST',
				headers: {
					'Content-Type': 'application/json'
				},
				body: JSON.stringify({
					fileName: file.name,
					fileType: file.type
				})
			});

			if (!getPresignedUrlResponse.ok) {
				console.error('Failed to get presigned URL');
			}

			const { presignedUrl, objectKey } = await getPresignedUrlResponse.json();
		}
	};
</script>
Here, we are sending a POST request to our /api/upload endpoint with the file name and type in the request body, and we are getting the pre-signed URL and object key from the response.
Uploading the file
Here is the structure of the presignedUrl we get from the server: https://<bucket-name>.<region>.r2.cloudflarestorage.com/<object-key>?<query-params>. We now basically need to send a PUT request to this URL with the file data in the request body.
<script lang="ts">
	const handleFileUpload = async (e: Event) => {
		const target = e.target as HTMLInputElement;
		const file = target.files?.[0];

		if (file) {
			// ... previous code

			const uploadToR2Response = await fetch(presignedUrl, {
				method: 'PUT',
				headers: {
					'Content-Type': file.type
				},
				body: file
			});

      if (!uploadToR2Response.ok) {
        console.error('Failed to upload file to R2');
      }
		}
	};
</script>
On a successful response, you can now go to your bucket dashboard on Cloudfare R2 and see your file.
Accessing the uploaded file
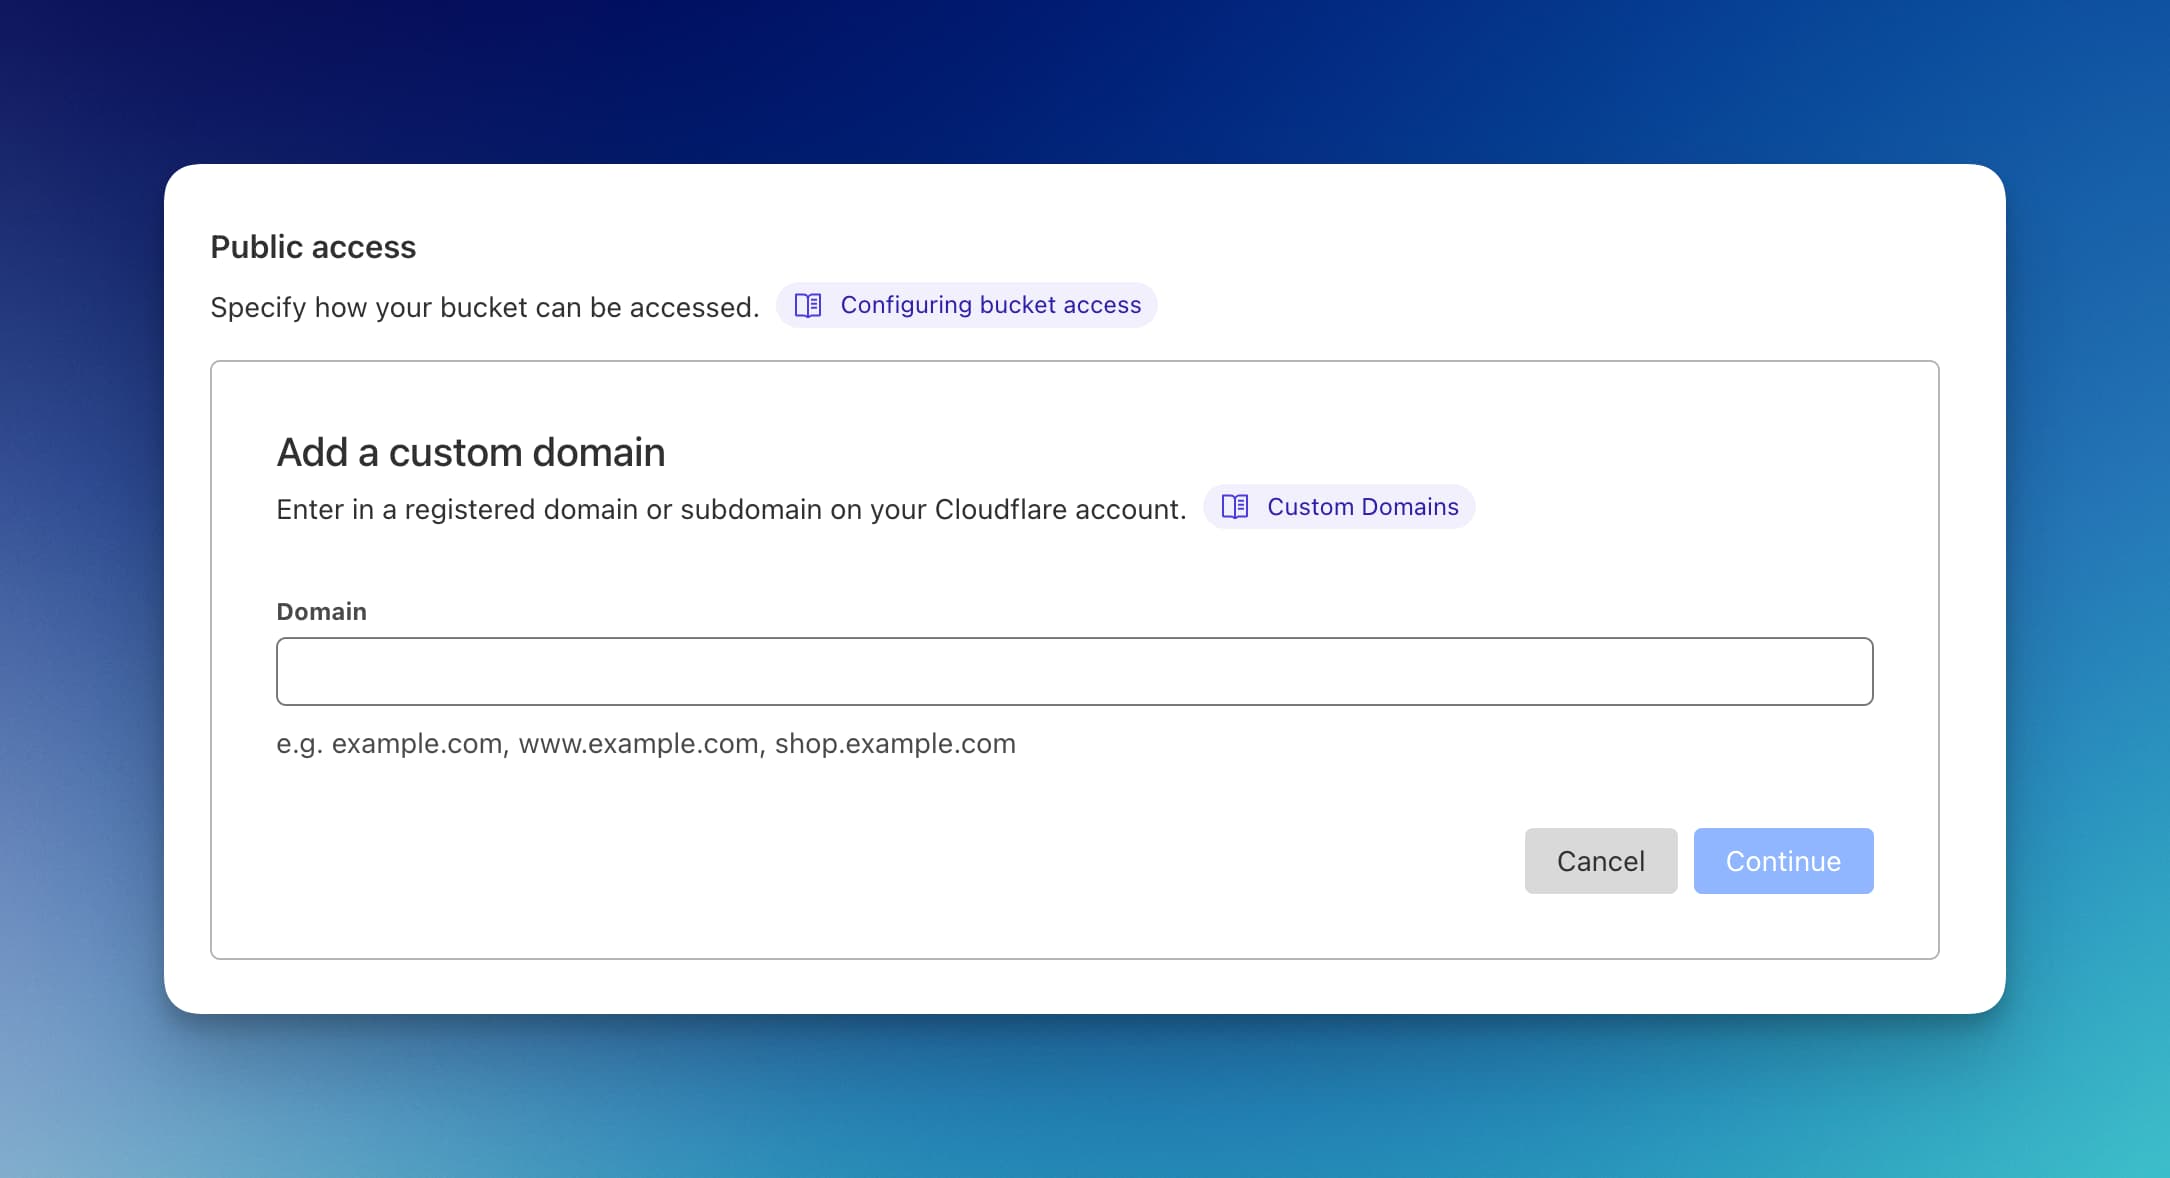
Per default, all buckets created on Cloudflare R2 are private. To access your bucket's files, you can either connect a custom domain you own to the bucket or use .r2.dev subdomain provided by Cloudflare.
Using a custom domain
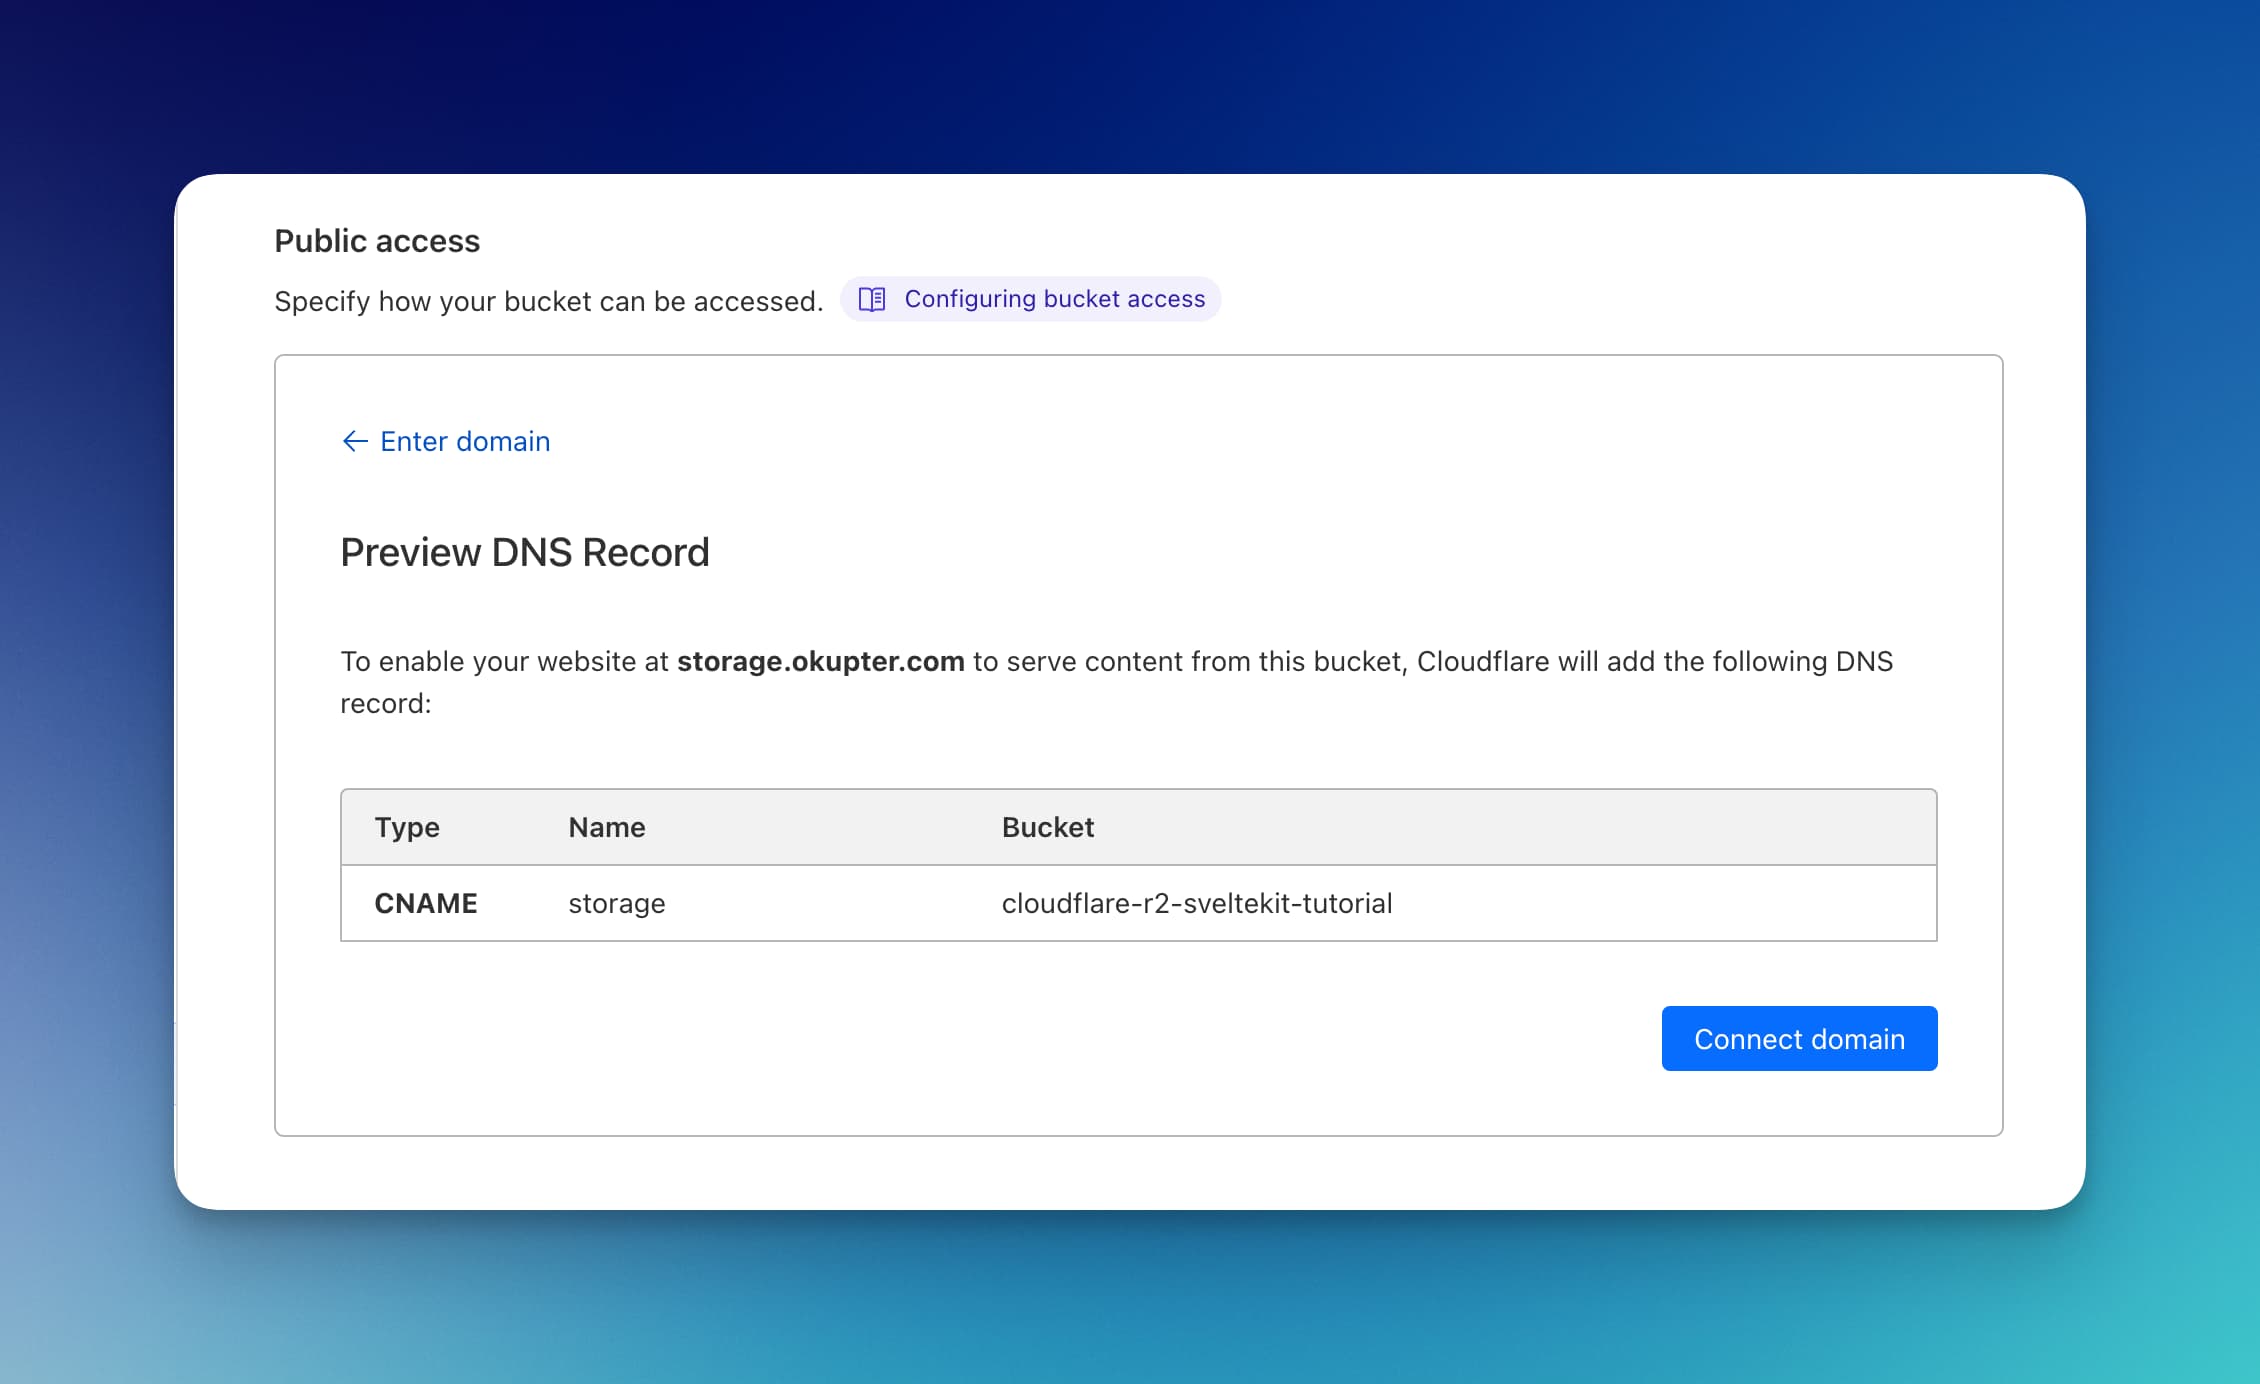
If your domain is already set up on Cloudflare, you just need to go to your bucket settings, and then in the "Public access" section, add your domain in the "Domain" field and click "Continue". This will give you a preview of the DNS records Cloudflare is going to add to your domain. If everything looks good, click "Connect domain".
It will take a few seconds before the DNS records are propagated, but once it's done, you should be able to access your files at https://<your-domain>/<object-key>.
In case your domain is not set up on Cloudflare, transfer your DNS management (not the domain) to Cloudflare, and then follow the steps above.
Using the .r2.dev subdomain
In addition to the custom domain option, Cloudflare also provides a .r2.dev subdomain for each bucket. Per default, this subdomain is not accessible publicly. To make it public, go to your bucket settings, and then in the "R2.dev subdomain" section, click "Allow access".
Keep in mind that this is not recommended for production environments, since, these subdomains are rate limited, and don't take advantage of features like bot management, caching, and more that are available for custom domains.
Wrapping up
I've come to enjoy using Cloudflare R2 for my personal projects, as well as for some clients' projects. It can be a great alternative to AWS S3, especially if you are already using Cloudflare a lot in your projects. I hope this article helped you get started with Cloudflare R2.